Hot 2 Technique: Wall, Match, Deliver. The Three Words That Fix Your Firezone Flat
Mar 27, 2026 2:18 pm
Coach -
You send a firezone. The pressure gets home. The quarterback is uncomfortable. And the ball still comes out clean to the flat for a first down.
That's not a pass rush problem. That's a schematic problem. The perimeter defender behind the pressure didn't know what to do, so the offense found the soft spot before the rush could finish.
Coach Brett Hickman, Assistant Head Coach and Defensive Coordinator at Anderson University, teaches the Hot 2 technique as part of Volume 15 of his Blackout Defense System. He's been running this firezone package for more than 15 seasons, and the Hot 2 player's read progression is one of the most detailed pieces in it. Three words: Wall. Match. Deliver. Each one tells the Hot 2 player exactly what to do with a specific route concept, so there's no guessing.
Video: Brett Hickman - Hot 2 Technique in 3 Deep Firezones
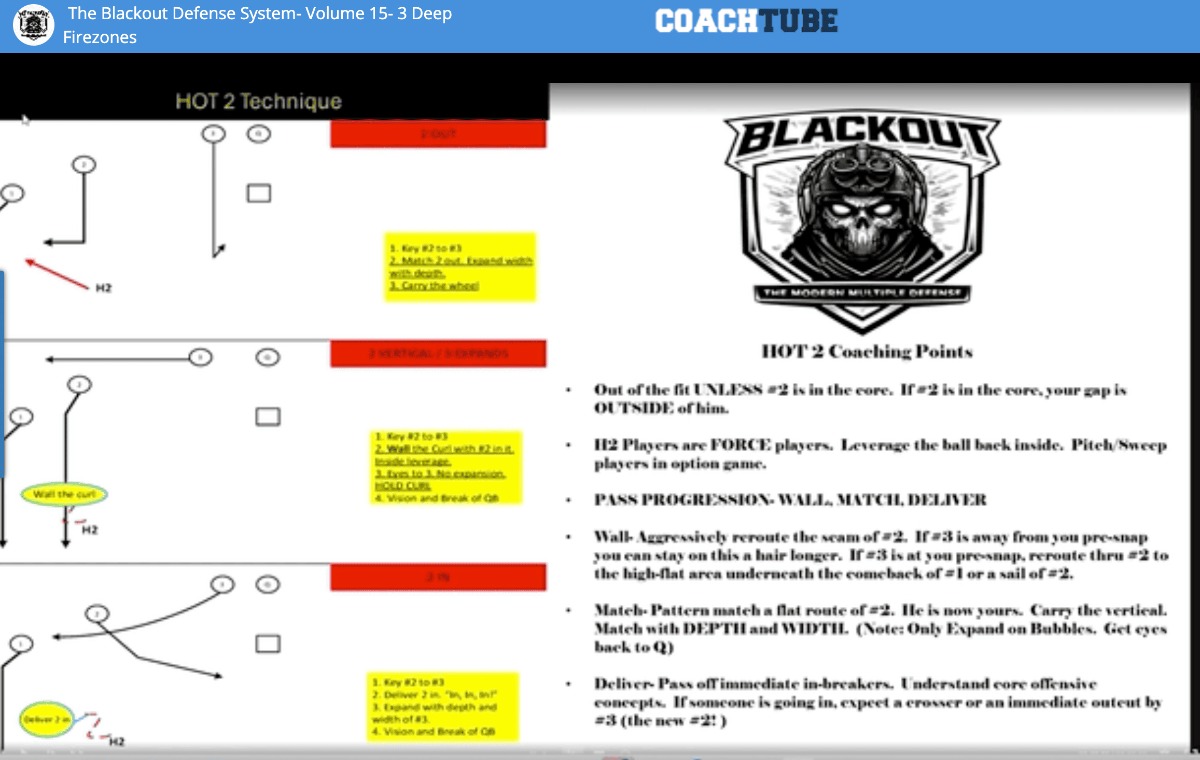
What the Hot 2 Player Actually Is
The Hot 2 is the perimeter force defender. He's typically lined up on a slot receiver or outside a tight end in a 4x4 look. His job isn't just pass coverage. He's the force player on the edge.
Perimeter screens, jet sweeps, the pitch in the option game. If the ball gets to the perimeter, this is the guy who forces it back inside. That's true in the run game and it's true on quick concepts that try to get outside leverage. If three is at him pre-snap, his tempo increases because he has to be ready for a quick three-receiver expansion to his side.
The run fit is simple. If number two is outside the core (a slot receiver), the Hot 2 player fits outside as the force defender. If number two is in the core (a tight end who blocks down), his gap becomes the outside gap of that tight end. He takes the first back out of the backfield. Coach Hickman covers the specifics in the clip above.
The Pass Progression: Wall, Match, Deliver
This is where the technique either holds up or falls apart. Once the Hot 2 player gets a pass key, Coach Hickman gives him three reads in order. Each one handles a specific vulnerability in Cover 3.
Wall the Seam
The seam is the first vulnerability in any Cover 3 structure, and it's the first thing the Hot 2 player addresses. His job is to aggressively reroute the vertical of number two. Get hands on him and disrupt the timing.
Here's the pre-snap adjustment that changes the tempo of the wall. If number three is away from the Hot 2 player, he can hang on the reroute longer. There's no immediate threat of a quick expansion to his side, so he can sit in the curl area and wall that seam with patience.
If number three is to him, the technique mirrors what Coach Hickman teaches in Volume 10 on Cover 3. Reroute through number two, get to the high flat area underneath the comeback of number one and over the top of the flare route of number three. That positioning lets him undercut sail routes and other concepts that try to stretch the defense from high to low.
Match the Flat
The flats are the second known vulnerability in Cover 3, and this is where the Hot 2 player transitions. Once the seam is handled, he matches the flat of number two.
But Coach Hickman is specific about how. This is zone match, not man match. The Hot 2 player matches with the depth of the curl and the width of the flat. He's playing top-down. That positioning matters because if the route turns vertical and becomes a wheel, he's already in a position to carry it. He doesn't have to flip his hips and chase.
There's one exception. On a bubble route, the Hot 2 player stays in zone with his eyes on the quarterback. He doesn't lock onto the bubble like it's a man assignment. Coach Hickman's reasoning: you're almost never going to see a bubble turn into a wheel route. Stay in zone. Expand. Don't chase a ghost.
Deliver In-Cuts
The third read is about what's coming from the other side of the formation. When number two breaks inside on a shallow cross, a dig, or an immediate in-breaker, the Hot 2 player passes him off and shifts his attention.
Coach Hickman teaches a simple rule: if you see number two go in, expect one of three things. A crosser from the backside. A flare route by the back. Or the curl route by number one sitting down in the vacated area. The Hot 2 player hangs in the curl zone unless something pulls him back to the flat. He doesn't chase the in-breaker. He reads what's coming next.
That "deliver" step is what keeps the Hot 2 player from getting sucked inside and leaving the entire flat exposed behind the pressure.
The seam, the flat, and the in-cut. Those are the three things offenses use to attack Cover 3 behind a firezone, and Coach Hickman's Wall-Match-Deliver progression gives your Hot 2 player a specific answer for each one. No freelancing. No guessing. One read at a time, in order.
Always be growing,
Coaches Clinic Community of Coaches Helping Coaches
P.S. This clip covers the Hot 2 technique, but Coach Hickman's full clinic, The Blackout Defense System: Volume 15 - 3 Deep Firezones, goes well beyond the perimeter player.
He breaks down the complete firezone package, including the pressure schemes themselves, coaching cues for every position in the rush and coverage, and the adjustments the defense makes when formations and personnel change.
If you're building or refining a firezone system with 3-deep coverage behind it, the full breakdown is below:
Link: Brett Hickman - The Blackout Defense System: Volume 15 - 3 Deep Firezones